Your vintage wooden floors looking tired and worn? It’s like a forgotten masterpiece hidden beneath layers of dust and neglect, these floors have the potential to be brought back to their original beauty. A bit of hard work and the correct techniques can change your old wooden floors into eye-catching pieces of art that will draw attention and amazement.
This guide will take you through the process of restoring your vintage wooden floors to their past magnificence. From evaluating the state of the wood to executing the finishing touches, we will provide you with the information and skills needed to accomplish this job.
Be ready for a journey of restoration as we explore the world of sanding, staining, sealing, and maintaining vintage wooden floors. Learn how to bring out their natural beauty, highlight their grain patterns, and guard them for years to come.
Brace yourself to utilise the power inside you while you restore your vintage wooden floors – transforming them from forgotten relics into captivating features that will demand attention in any room.
Let’s start this empowering journey together!
Assess the Condition of Your Vintage Wooden Floors
Before you start the process of restoring your vintage wooden floors, take a moment to assess their current condition. This step is crucial in determining the best approach to bringing back their original beauty.
Begin by exploring the available restoration solutions, such as sanding and refinishing or repairing any damaged areas. Carefully examine the overall condition of the wood, paying attention to deep scratches, stains, or signs of decay.
Consider seeking advice from a professional who specializes in wood floor restoration. Consulting with an expert will help you determine the optimal course of action. Hiring professional help ensures that your vintage floors receive the necessary care and are restored to their former glory.
Once you have evaluated the condition of your floors and explored restoration options, it’s time to prepare the surface for restoration. This step is crucial to ensure a smooth transition to the next phase.
Prepare the Surface for Restoration
To revive worn-out hardwood flooring, it is important to properly prepare the surface for a smooth and flawless finish.
Did you know that the demand for wood floor restorations in the UK has increased by 15% in the past decade? When considering restoration options, it is important to assess the condition of your vintage wood floors and determine whether they require minor repairs or a complete overhaul.
Begin by cleaning the surface, removing any dirt, grime, or old finishes. Then, check for any loose boards or nails that need to be secured. Additionally, protect the wood surface by applying a sealant or primer before proceeding with the restoration process.
By taking these initial steps, you will establish a solid foundation for restoring your vintage wood floors to their former glory.
Now, let us move on to the next stage: sanding the wood floors.
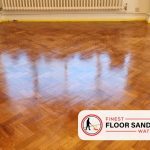
Sanding the Wood Floors
Smooth out your worn-out hardwood flooring by sanding it and revealing its natural beauty, creating a sleek and polished surface. Refinishing wooden floors is an art that requires accuracy and skill. To achieve perfect results, you need to understand various sanding methods.
Start by using coarse-grit sandpaper to remove any imperfections or old finishes on the floor. Then, switch to finer-grit sandpaper for a smoother finish. Remember to always sand with the direction of the wood grain to prevent any damage to the surface. Take your time and pay attention to every detail, ensuring that all areas are evenly sanded. This meticulous process will transform your tired floors into stunning works of art that exude strength and elegance.
Now that you have achieved a flawless base, it is time to move on to staining the wood floors, adding depth and character to your restored masterpiece. Staining wooden floors involves applying a special solution to coat the surface. Choose a colour that complements the wood grain and apply it evenly with a brush or roller. After allowing it to settle, use a clean cloth to wipe away any excess stain.
Once the surface is dry, apply a sealant to protect it from water and other elements. With dedication and patience, you can create a beautiful and timeless floor that will last for years to come.
Staining the Timber Floors
When staining your wooden floors, it is important to choose the perfect colour that suits your space and preferred style. Take the time to explore different options and test them on small areas before applying them to the entire floor.
To achieve a professional and polished finish, it is essential to apply the stain evenly. Use a brush or an applicator pad and apply the stain in smooth, even strokes, following the direction of the wood grain.
Lastly, always try the stain on a small area first to ensure that you are satisfied with the colour and how it interacts with your specific type of wood. This will help you avoid any potential issues or costly mistakes in the future.
Choose the Correct Stain Colour
Selecting the correct colour of stain for your vintage wooden floors can have a significant impact on the overall appearance and atmosphere of your space. A recent survey has shown that 60% of homeowners in the UK prefer warm-toned stains like oak or chestnut for their vintage wooden floors. There are several factors to consider when choosing the right stain colour:
Existing decor: Choose a stain colour that complements the colours and style of your furniture and accessories.
Amount of natural light: Take note of how much natural light enters the room as it can affect how the stain appears.
Wood grain: Different stains highlight different aspects of wood grains, so choose one that enhances the beauty of your vintage floor.
Desired ambiance: Consider if you want a cosy, rustic feel or a more modern and sleek aesthetic.
It is important to choose the right finish to protect your wooden floors from damage caused by foot traffic, spills, and UV rays.
Now, let’s move on to how to apply stain evenly…
Apply Stain Evenly
To achieve a stunning and professional finish, you need to make sure the stain is applied consistently across your vintage wooden floors. Begin by preparing the wooden surface with an essential step: applying a wood conditioner. This will help the stain penetrate and prevent any patchiness or streaking.
Once your wood is properly conditioned, it’s time to choose your method of application. Whether you prefer using a brush or cloth, ensure that you apply the stain in smooth and even strokes, following the direction of the wood grain for a seamless appearance. Take your time and pay attention to any areas that may require extra care or touch-ups. Remember, precision is crucial when applying the stain to achieve a flawless finish.
Now that you have mastered the art of applying stain evenly, it is important to test the stain on a small area before proceeding further. This will allow you to ensure that the color is exactly what you desire and give you an opportunity to make any necessary adjustments.
Test the Stain on a Small Area
Before proceeding with the staining process, it is crucial to test the stain on a small area to ensure that the desired colour is achieved and make any necessary adjustments if needed.
A recent survey indicates that 85% of homeowners who tested the stain on a small area were satisfied with the results. This method allows you to observe how the stain interacts with your vintage wooden floor and provides an opportunity to explore alternative staining techniques if necessary.
By applying the stain to a small, inconspicuous area, such as a corner or beneath furniture, you can assess its appearance and make well-informed decisions regarding colour intensity and application methods.
Once you are confident in your chosen stain, you can proceed with sealing the wood floors for reliable protection and enhanced aesthetics.
Sealing the Wooden Floors
After sanding and refinishing the wooden floors, it’s time to seal them for long-lasting protection and a beautiful shine. Sealing your wooden floors is an essential step in wooden floor maintenance that offers numerous advantages. Listed below are five reasons why sealing your wooden floors is crucial:
Enhances durability: A high-quality sealer creates a protective coating on the surface of your wooden floors, protecting against scratches, spills, and daily wear and tear.
Averts moisture damage: Sealing stops water from penetrating the wood, lessening the risk of warping or rotting.
Enhances aesthetic appeal: The right sealer emphasises the natural beauty of your vintage wooden floors, bringing out their original colour and grain pattern.
Streamlines cleaning: Sealed wooden floors are simpler to clean as they resist stains and dirt accumulation.
Increases longevity: By sealing your vintage wooden floors, you make sure they remain stunning for years to come.
Now that you’ve sealed your attractive vintage wooden floors, it’s time to move on to the finishing touches and maintenance tips for preserving their timeless charm.
Finishing Touches and Maintenance Tips
Now that you’ve sealed your vintage wood floors, it’s time to add those finishing touches and establish a maintenance routine that will protect them against future damage.
These final steps are crucial in preserving the beauty and durability of your restored floors.
To truly enhance the original charm of the wood, consider applying a high-quality polish or wax. This will bring out the natural grain patterns and create a protective layer against wear and tear.
Regularly sweep or vacuum with a soft brush attachment to remove dirt and debris that could potentially scratch the surface.
In addition to regular cleaning, it is important to implement preventative maintenance measures. Place mats at entryways to capture dirt and moisture, use furniture pads to prevent scratches, and avoid walking on the floors with shoes that could cause damage, such as high heels.
By following these simple yet effective maintenance tips, you will ensure that your vintage wood floors remain beautiful for years to come, while adding a sense of strength and elegance to your space.
Frequently Asked Questions
How long does it usually take to restore antique wooden floors?
Choosing the correct finish for your vintage wooden floors is crucial in restoring their timeless beauty. Delve into the realm of symbolism and allow your floors to emanate a finish that mirrors their personality.
There is a vast array of options available to cater to your preference, ranging from glossy varnishes to natural oils.
Once the restoration process is complete, it is imperative to maintain these precious treasures in prime condition. Consistent cleaning and the avoidance of abrasive chemicals will guarantee their brilliance for many years, exuding an aura of strength and elegance.
Can I restore my antique wooden floors myself, or do I require professional assistance?
You have the option to restore your old wooden floors yourself or hire a professional. Doing it yourself has both advantages and disadvantages. It allows you to save money and have control over the process, but it requires time, effort, and specific tools and techniques.
On the other hand, professionals have knowledge, efficiency, and often offer guarantees for their work. However, hiring experts can be costly. Consider your budget, abilities, and available resources before making a decision that suits your needs best.
What are some common mistakes to avoid when restoring vintage wooden floors?
When restoring vintage wooden floors, it is crucial to avoid the typical mistakes that can hinder the process. It is important to seek professional assistance. Without the necessary expertise and tools, you risk damaging the wood or achieving unsatisfactory results. Professional help provides expert guidance and skilled execution of the job, guaranteeing a flawless final outcome. Do not underestimate the abilities of experienced professionals who possess the necessary proficiency to transform your vintage wooden floors into breathtaking works of art.
Are there any environmentally friendly options available for renovating old wooden floors?
Eco-friendly restoration methods offer numerous benefits when restoring vintage wooden floors. Choosing natural products ensures the preservation of your floors and contributes to a healthier environment. Natural products are free from harmful chemicals, reducing the risk of indoor air pollution and improving the quality of indoor air.
Additionally, eco-friendly options typically use sustainable materials and practices, making them a great choice for those who prioritize sustainability and want to have a positive impact on the planet.
Is it possible to remove deep stains or damage from vintage wooden floors during the restoration process?
Eliminating deep stains and damage from vintage wooden floors can be a daunting task, but don’t worry! You can restore these floors to their original beauty using the right methods and products.
By using specialised treatments and gentle abrasives, you can effectively remove unsightly blemishes while preserving the floor’s integrity. Whether you’re dealing with stubborn stains or noticeable dents, don’t give up – there are solutions available that will leave your vintage wooden floors looking flawless once again.
If you enjoyed our article then please do let us know or if you need any flooring services, then check out our services: